Uncompress the downloaded font archive to a directory and add it to the font path, a list of directories containing fonts:
Uncompress the archive# tar xvzf utf8.tar.gzor# tar xvjf arial.tar.bz2
Create a directory for new fonts# mkdir /usr/share/fonts/truetype
Move the uncompressed font files to the new font directory# mv *.ttf /usr/share/fonts/truetype
Navigate to the font directory# cd /usr/share/fonts/truetype
Create fonts.scale and fonts.dir# mkfontscale && mkfontdir# fc-cache
Add the new font directory to the X11 font path# chkfontpath --add /usr/share/fonts/truetype
Restart X font server# /etc/rc.d/init.d/xfs restart
You can verify the successful addition of the new path by running chkfontpath command or by listing X font server's /etc/X11/XF86Config file.
If you do not have root access, copy the *.ttf to ~/.fonts directory instead.
Make X11 fonts available to Java
Perform one of the following:
Open /etc/profile and add a new environment variableJAVA_FONTS=/usr/share/fonts/truetypeexport JAVA_FONTS
Open font.properties file under jre/lib directory, uncommnent and set to the appropriate font directoryappendedfontpath=/usr/share/fonts/truetype
Install and configure Unicode TrueType fonts in Linux
Labels: Linux 0 commentsAnatomy of the Linux kernel
Labels: Linux 0 comments The Linux® kernel is the core of a large and complex operating system, and while it's huge, it is well organized in terms of subsystems and layers. In this article, you explore the general structure of the Linux kernel and get to know its major subsystems and core interfaces. Where possible, you get links to other IBM articles to help you dig deeper.
capture_referrer();
Show more developerWorks content related to my search
-->
Given that the goal of this article is to introduce you to the Linux kernel and explore its architecture and major components, let's start with a short tour of Linux kernel history, then look at the Linux kernel architecture from 30,000 feet, and, finally, examine its major subsystems. The Linux kernel is over six million lines of code, so this introduction is not exhaustive. Use the pointers to more content to dig in further.
A short tour of Linux history
Linux or GNU/Linux?
While Linux is arguably the most popular open source operating system, its history is actually quite short considering the timeline of operating systems. In the early days of computing, programmers developed on the bare hardware in the hardware's language. The lack of an operating system meant that only one application (and one user) could use the large and expensive device at a time. Early operating systems were developed in the 1950s to provide a simpler development experience. Examples include the General Motors Operating System (GMOS) developed for the IBM 701 and the FORTRAN Monitor System (FMS) developed by North American Aviation for the IBM 709.
In the 1960s, Massachusetts Institute of Technology (MIT) and a host of companies developed an experimental operating system called Multics (or Multiplexed Information and Computing Service) for the GE-645. One of the developers of this operating system, AT&T, dropped out of Multics and developed their own operating system in 1970 called Unics. Along with this operating system was the C language, for which C was developed and then rewritten to make operating system development portable.
Twenty years later, Andrew Tanenbaum created a microkernel version of UNIX®, called MINIX (for minimal UNIX), that ran on small personal computers. This open source operating system inspired Linus Torvalds' initial development of Linux in the early 1990s.
Now on to a high-altitude look at the GNU/Linux operating system architecture. You can think about an operating system from two levels, as shown in Figure 2.Figure 2. The fundamental architecture of the GNU/Linux operating system
There is also the GNU C Library (glibc). This provides the system call interface that connects to the kernel and provides the mechanism to transition between the user-space application and the kernel. This is important because the kernel and user application occupy different protected address spaces. And while each user-space process occupies its own virtual address space, the kernel occupies a single address space. For more information, see the links in the Resources section.
The Linux kernel can be further divided into three gross levels. At the top is the system call interface, which implements the basic functions such as read and write. Below the system call interface is the kernel code, which can be more accurately defined as the architecture-independent kernel code. This code is common to all of the processor architectures supported by Linux. Below this is the architecture-dependent code, which forms what is more commonly called a BSP (Board Support Package). This code serves as the processor and platform-specific code for the given architecture.
When discussing architecture of a large and complex system, you can view the system from many perspectives. One goal of an architectural decomposition is to provide a way to better understand the source, and that's what we'll do here.
The Linux kernel implements a number of important architectural attributes. At a high level, and at lower levels, the kernel is layered into a number of distinct subsystems. Linux can also be considered monolithic because it lumps all of the basic services into the kernel. This differs from a microkernel architecture where the kernel provides basic services such as communication, I/O, and memory and process management, and more specific services are plugged in to the microkernel layer. Each has its own advantages, but I'll steer clear of that debate.
Over time, the Linux kernel has become efficient in terms of both memory and CPU usage, as well as extremely stable. But the most interesting aspect of Linux, given its size and complexity, is its portability. Linux can be compiled to run on a huge number of processors and platforms with different architectural constraints and needs. One example is the ability for Linux to run on a process with a memory management unit (MMU), as well as those that provide no MMU. The uClinux port of the Linux kernel provides for non-MMU support. See the Resources section for more details.
Now let's look at some of the major components of the Linux kernel using the breakdown shown in Figure 3 as a guide.Figure 3. One architectural perspective of the Linux kernel
System call interface
The SCI is a thin layer that provides the means to perform function calls from user space into the kernel. As discussed previously, this interface can be architecture dependent, even within the same processor family. The SCI is actually an interesting function-call multiplexing and demultiplexing service. You can find the SCI implementation in ./linux/kernel, as well as architecture-dependent portions in ./linux/arch. More details for this component are available in the Resources section.
Process management
What is a kernel?As shown in Figure 3, a kernel is really nothing more than a resource manager. Whether the resource being managed is a process, memory, or hardware device, the kernel manages and arbitrates access to the resource between multiple competing users (both in the kernel and in user space).
Process management is focused on the execution of processes. In the kernel, these are called threads and represent an individual virtualization of the processor (thread code, data, stack, and CPU registers). In user space, the term process is typically used, though the Linux implementation does not separate the two concepts (processes and threads). The kernel provides an application program interface (API) through the SCI to create a new process (fork, exec, or Portable Operating System Interface [POSIX] functions), stop a process (kill, exit), and communicate and synchronize between them (signal, or POSIX mechanisms).
Also in process management is the need to share the CPU between the active threads. The kernel implements a novel scheduling algorithm that operates in constant time, regardless of the number of threads vying for the CPU. This is called the O(1) scheduler, denoting that the same amount of time is taken to schedule one thread as it is to schedule many. The O(1) scheduler also supports multiple processors (called Symmetric MultiProcessing, or SMP). You can find the process management sources in ./linux/kernel and architecture-dependent sources in ./linux/arch). You can learn more about this algorithm in the Resources section.
Memory management
Another important resource that's managed by the kernel is memory. For efficiency, given the way that the hardware manages virtual memory, memory is managed in what are called pages (4KB in size for most architectures). Linux includes the means to manage the available memory, as well as the hardware mechanisms for physical and virtual mappings.
But memory management is much more than managing 4KB buffers. Linux provides abstractions over 4KB buffers, such as the slab allocator. This memory management scheme uses 4KB buffers as its base, but then allocates structures from within, keeping track of which pages are full, partially used, and empty. This allows the scheme to dynamically grow and shrink based on the needs of the greater system.
Supporting multiple users of memory, there are times when the available memory can be exhausted. For this reason, pages can be moved out of memory and onto the disk. This process is called swapping because the pages are swapped from memory onto the hard disk. You can find the memory management sources in ./linux/mm.
The virtual file system (VFS) is an interesting aspect of the Linux kernel because it provides a common interface abstraction for file systems. The VFS provides a switching layer between the SCI and the file systems supported by the kernel (see Figure 4).Figure 4. The VFS provides a switching fabric between users and file systems
At the top of the VFS is a common API abstraction of functions such as open, close, read, and write. At the bottom of the VFS are the file system abstractions that define how the upper-layer functions are implemented. These are plug-ins for the given file system (of which over 50 exist). You can find the file system sources in ./linux/fs.
Below the file system layer is the buffer cache, which provides a common set of functions to the file system layer (independent of any particular file system). This caching layer optimizes access to the physical devices by keeping data around for a short time (or speculatively read ahead so that the data is available when needed). Below the buffer cache are the device drivers, which implement the interface for the particular physical device.
Network stack
The network stack, by design, follows a layered architecture modeled after the protocols themselves. Recall that the Internet Protocol (IP) is the core network layer protocol that sits below the transport protocol (most commonly the Transmission Control Protocol, or TCP). Above TCP is the sockets layer, which is invoked through the SCI.
The sockets layer is the standard API to the networking subsystem and provides a user interface to a variety of networking protocols. From raw frame access to IP protocol data units (PDUs) and up to TCP and the User Datagram Protocol (UDP), the sockets layer provides a standardized way to manage connections and move data between endpoints. You can find the networking sources in the kernel at ./linux/net.
Device drivers
The vast majority of the source code in the Linux kernel exists in device drivers that make a particular hardware device usable. The Linux source tree provides a drivers subdirectory that is further divided by the various devices that are supported, such as Bluetooth, I2C, serial, and so on. You can find the device driver sources in ./linux/drivers.
Architecture-dependent code
While much of Linux is independent of the architecture on which it runs, there are elements that must consider the architecture for normal operation and for efficiency. The ./linux/arch subdirectory defines the architecture-dependent portion of the kernel source contained in a number of subdirectories that are specific to the architecture (collectively forming the BSP). For a typical desktop, the i386 directory is used. Each architecture subdirectory contains a number of other subdirectories that focus on a particular aspect of the kernel, such as boot, kernel, memory management, and others. You can find the architecture-dependent code in ./linux/arch.
Back to top
Interesting features of the Linux kernel
If the portability and efficiency of the Linux kernel weren't enough, it provides some other features that could not be classified in the previous decomposition.
Linux, being a production operating system and open source, is a great test bed for new protocols and advancements of those protocols. Linux supports a large number of networking protocols, including the typical TCP/IP, and also extension for high-speed networking (greater than 1 Gigabit Ethernet [GbE] and 10 GbE). Linux also supports protocols such as the Stream Control Transmission Protocol (SCTP), which provides many advanced features above TCP (as a replacement transport level protocol).
Linux is also a dynamic kernel, supporting the addition and removal of software components on the fly. These are called dynamically loadable kernel modules, and they can be inserted at boot when they're needed (when a particular device is found requiring the module) or at any time by the user.
A recent advancement of Linux is its use as an operating system for other operating systems (called a hypervisor). Recently, a modification to the kernel was made called the Kernel-based Virtual Machine (KVM). This modification enabled a new interface to user space that allows other operating systems to run above the KVM-enabled kernel. In addition to running another instance of Linux, Microsoft® Windows® can also be virtualized. The only constraint is that the underlying processor must support the new virtualization instructions. See the Resources section for more information.
C Shell commmands
Labels: Linux 0 commentsThe C shell provides the following built-in commands:
# Marks a command.
alias Displays alias.
bg Resumes job in the background.
break Resumes execution after the loop.
breaksw Breaks from a switch command; resumes after the endsw command.
case Defines a label in a switch command.
cd Changes directory.
chdir Changes directory, same as cd.
continue Continues a loop.
default Specifies the default case in a switch.
dirs Displays the directory stack.
echo Writes arguments to the standard output of the shell.
eval Evaluates a command.
exec Executes the command in the current shell.
exit Exits the shell.
fg Brings a job in the foreground.
foreach Specifies a looping control statement and execute a sequence of commands until reaching an end command.
glob Writes arguments to the standard output of the shell, like the echo command, but without the new line.
goto Continues execution after the specified label.
hashstat Displays hash table statistics.
history Displays the history list.
if Executes a command if condition met.
jobs Lists active jobs.
kill Sends a signal to a process. term (terminate) is the default signal.
limit
Sets or list system resource limits.
login Logs on.
logout Logs out.
nice Changes the priority of commands run in the shell.
nohup Ignores the hangup signal.
notify
Notifies the user about changes in job status.
onintr Tells the shell what to do on interrupt.
popd Pops the top directory off the directory stack and changes to the new top directory.
pushd Exchanges the top two elements of the directory stack.
rehash Re-computes the hash table of the contents of the directories in the path shell variable.
repeat
Repeats the execution of a command.
set Displays or set the value of a shell variable.
setenv Sets environment variables.
shift Shifts shell arguments.
source Reads commands from a script.
stop
Stops a background job.
suspend Stops the current shell.
switch Starts a switch.
time Displays the time used to execute commands.
umask Shows or set file permissions.
unalias
Removes command alias.
unhash Disables the internal hash table.
unlimit Removes limitations on system Resource.
unset Deletes shell variables.
unsetenv Deletes environment variables.
wait Waits for background jobs to complete.
while …end
Executes the commands between the while and matching end statements repeatedly.
@ Displays or set the values of all the shell variables.
The Linux/Unix shell refers to a special program that allows you to interact with it by entering certain commands from the keyboard; the shell will execute the commands and display its output on the monitor. The environment of interaction is text-based (unlike the GUI-based interaction we have been using in the previous chapters) and since it is command-oriented this type of interface is termed Command Line interface or CLI. Before the advent of GUI-based computing environments, the CLI was the only way that one can interact and access a computer system.
Up until now, there was never a need to type commands into a shell; and with the modernisation and creation of a lot of newer GUI-based tools, the shell is becoming increasingly un-required to perform many tasks. But that said, the shell is a very powerful place, and a lot is achieved through it.
Sponsored Links
Linux TutorialGet the latest news, white papers, discussion threads, and much more.Linux.ITtoolbox.com
Amanda Backup SoftwareOpen Source Data Protection Simple, Secure, Enterprise Readywww.zmanda.com
Free RAD tool for LinuxDevelop Desktop application rapidly No knowledge of C++, Java requiredwww.go-db.com/godb_linux.asp
A lot of the front-end GUI methods of doing things have similar ways and means to get done with using the shell. Professional Linux and UNIX users find the shell very powerful, and an introduction to at least the basic shell usage is useful.--
Linux init ("ASCII art")
Labels: Linux 0 commentsLinux init ("ASCII art")
Pictorially (loosely speaking :), Linux initialization looks like
this, where "[...]" means optional (depends on the kernel's
configuration) and "{...}" is a comment.
+-------------------------------+ | arch/i386/boot/setup.S:: + | | arch/i386/boot/video.S:: | |-------------------------------| | start_of_setup: | | check that loaded OK | | get system memory size | | get video mode(s) | | get hard disk parameters | | get MC bus information | | get mouse information | | get APM BIOS information | | enable address line A20 | | reset coprocessor | | mask all interrupts | | move to protected mode | | jmp to startup_32 | +-------------------------------+ | v +-------------------------------+ | arch/i386/kernel/head.S:: | |-------------------------------| | startup_32: | | set segment registers to | | known values | | init basic page tables | | setup the stack pointer | | clear kernel BSS | | setup the IDT | | checkCPUtype | | load GDT, IDT, and LDT | | pointer registers | | start_kernel | | {it does not return} | +-------------------------------+ | v +-------------------------------+ +-------------------------------+ | init/main.c:: | +->| arch/i386/kernel/setup.c:: | |-------------------------------| | |-------------------------------| | start_kernel(): | | | setup_arch(): | | lock_kernel | | | copy boot parameters | | setup_arch |--+ | init ramdisk | | parse_options |<-+ | setup_memory_region | | trap_init | | | parse_cmd_line | | cpu_init | | | use the BIOS memory map to | | init_IRQ | | | setup page frame info. | | sched_init | | | reserve physical page 0 | | init_timervecs | | | [find_smp_config] | | time_init | | | paging_init | | softirq_init | | | [get_smp_config] | | console_init | | | [init_apic_mappings] | | [init_modules] | | | [reserve INITRD memory] | | [profiling setup] | | | probe_roms to search | | kmem_cache_init | | | for option ROMs | | sti | | | request_resource to | | calibrate_delay | | | reserve video RAM memory | | [INITRD setup] | | | request_resource to | | mem_init | | | reserve all standard PC | | free_all_bootmem | +--| I/O system board resources| | kmem_cache_sizes_init | +-------------------------------+ | [proc_root_init] | | fork_init | | proc_caches_init | | vfs_caches_init | | buffer_init | | page_cache_init | | kiobuf_setup | | signals_init | +-------------------------------+ | bdev_init | | init/main.c:: | | inode_init | | init(): {...init thread...} | | [ipc_init] | | do_basic_setup | | [dquot_init_hash] | | {bus/dev init & initcalls}| | check_bugs | | free_initmem | | [smp_init] {*below} | | open /dev/console | | start init thread {---->} |.....| exec init script or shell | | unlock_kernel | | or panic | | cpu_idle | +-------------------------------+ +-------------------------------+ +-------------------------------+ | smpboot.c::smp_init | |-------------------------------| | arch/i386/kernel/smpboot.c:: | | smp_boot_cpus(): | | [mtrr_init_boot_cpu] | | smp_store_cpu_info | | print_cpu_info | | save CPU ID/APIC ID mappings| | verify_local_APIC | | connect_bsp_APIC | | setup_local_APIC | | foreach valid APIC ID | | do_boot_cpu(apicid) | | setup_IO_APIC | | setup_APIC_clocks | | synchronize_tsc_bp | +-------------------------------+
Reliance LG LSP 340 Series WLL Modem Setup HOWTO
Labels: Internet, Linux 0 comments1. Introduction
This HOWTO is for people who have Reliance or TATA Indicomm WLL phones and wish to access Internet on their desktops/laptops running GNU/Linux using serial cable (NOT a USB CABLE).
No software provided by Reliance was used, but I did search the Internet for the modem query strings which are required during PPP setup.
I have tried this setup on Slackware Linux 10.1 with a 2.4.29 kernel and I am pretty confident that this trick will work on other Linux distributions as well.
The HOWTO assumes that you have a fair knowledge about your Linux distribution (BSD or System V style) and that PPP support is pre-compiled in your Linux kernel.
In this HOWTO we are talking about the serial cable for the following reasons:
The cable provided by Reliance or TATA is very expensive (about 1400 rupees) and the software provided supports only MS Windows.The cable typically has a USB interface on one end and an RJ-45 interface on the other. However, for these phones phones a cheaper cable is available on the market (only 100 rupees). This cable has a serial interface on one end and an RJ-45 on the other. You can make this cable yourself. The procedure is discussed later in this HOWTO. Why waste money when you can assemble your own cable or purchase the cheaper one?
USB cables have some glitches for the WLL handsets, especially the LG ones. I have no idea about other handsets, your input is welcome if you know about other sets. The advantage in using a USB cable is that you can connect at 153.6 kbps as the handsets have an inbuilt modem which is capable for speeds upto 170kbps.
On the numerous forums I searched on the net I found that all talked only about the USB cable and not about the serial one. I thought it was high time to write this HOWTO to help fellow Linux users.
But I have a USB cable!
If you have the USB cable after all, visit http://www.hackgnu.org/ril-howto.html for information about setting up Internet access using LG/SAMSUNG CDMA sets.
This link is also helpful: http://www.linuxsolved.com/forums/ftopic1178.html
Unfortunately the LG/SAMSUNG CDMA mobile uses USB cables only, but the good news is that these USB cables are also available on the market. Purchase them at your local computer vendor's. As per my last information such cables cost only 200 rupees.
2. System Requirements
You will need a GNU/Linux system with a kernel having PPP support pre-compiled. I have tested that both the 2.4.29 kernel and the 2.6.x series kernel work fine. Performance seems to be better using a 2.6.x kernel. If you see that some kernel modules are missing then configure and recompile the kernel with PPP support.
Check with Section 4 for the configuration of PPP.
A connecting serial cable which has on one end an RJ-45 connector which plugs into the phone and on the other end has an RS-232 serial connector which is plugged into the serial port of the PC.
I built my cable myself. I used a CAT 5 cable which has four pairs of UTP copper. CAT 5 cable is the same cable which is used for networking your system to a LAN. While you can use any type of cable, CAT 5 will assure a good quality of the signal that is sent over the wire. A typical configuration looks like this:
RS-232C Serial Female connector, which is plugged into the PC:
___________________
\ /
\ 5 4 3 2 1 /
\ 9 8 7 6 /
\___________/
Now let's start with the PIN Configuration
PIN 1 - White Brown cable
PIN 2 - Blue cable
PIN 3 - White Green cable
PIN 4 - Green cable
PIN 5 - White Blue cable
PIN 6 - Brown cable
PIN 7 - White Orange cable
PIN 8 - Orange cable
PIN 9 - Leave empty (we are only using 8 pins)
Serial connection details
Three strings would be enough for a serial connection, but it turned out that the signal is better when you use 5. The other strings are used for extra rigidness and support of the cable.
Now on to the RJ-45 connector, which is plugged into the WLL Phone RJ-45 jack:
[8 7 6 5 4 3 2 1]
----
-
1 - White Orange
2 - Orange
3 - White Green
4 - Blue
5 - White Blue
6 - Green
7 - White Brown
8 - Brown
How to hold the connector
If you are confused as to which way to hold the connector, make sure that you are holding the connector in such a way that its notch pin is facing towards the floor and that the open portion (portion from where the wires enter) is facing away from you.
3. Activating Internet Services on your Handset
To get Internet services activated on your handset you may contact the customer care center of your service provider. In the case of the Reliance the service is pre-activated.
For establishing the connection on a Reliance, the user name is the phone number without the prefix 0 in the STD code. For instance, if your STD code is 0124 and telephone number is 3456789 then your user name is 1243456789. Your password is the same as your user name. When using the TATA Indicomm user name and password are "internet" (without quotes).
4. Checking for PPP Support
Although PPP support is provided in almost all Linux distributions but it is still better to check whether it is present on your system. You can use checkconfig or, better still, look into the /usr/sbin directory and locate PPP binaries with the command
ls -al ppp*
If you get a listing like this:
-rwxr-xr-x 1 root root 3438 2005-05-28 14:56 ppp-go*
-rwxr-xr-x 1 root bin 1787 2004-02-26 21:36 ppp-off*
lrwxrwxrwx 1 root root 6 2005-05-28 14:17 ppp-on -> ppp-go*
lrwxrwxrwx 1 root root 7 2005-05-28 14:17 ppp-stop -> ppp-off*
-rwxr-xr-x 1 root bin 346812 2004-02-26 21:36 pppd*
-rwxr-xr-x 1 root bin 37916 2004-02-26 21:36 pppdump*
-rwxr-xr-x 1 root bin 25936 2003-03-02 22:05 pppoe*
-rwxr-xr-x 1 root bin 22308 2003-03-02 22:05 pppoe-relay*
-rwxr-xr-x 1 root bin 35084 2003-03-02 22:05 pppoe-server*
-rwxr-xr-x 1 root bin 12028 2003-03-02 22:05 pppoe-sniff*
-rwxr-xr-x 1 root bin 58527 2004-02-26 21:36 pppsetup*
-rwxr-xr-x 1 root bin 9192 2004-02-26 21:36 pppstats*
then PPP support is definitely present.
Similarly, look into /etc/ppp directory, which contains the PPP options file and some other files configuring PPP:
-rw------- 1 root root 78 2004-02-26 21:36 chap-secrets
-rw------- 1 root root 1625 2005-05-28 14:35 connect-errors
-rw-r--r-- 1 root root 938 2003-03-02 22:04 firewall-masq
-rw-r--r-- 1 root root 836 2003-03-02 22:04 firewall-standalone
-rwxr-xr-x 1 root root 1208 2005-05-28 14:56 ip-down*
-rwxr-xr-x 1 root root 1208 2005-05-28 14:29 ip-down.OLD*
-rwxr-xr-x 1 root root 1945 2005-05-28 14:56 ip-up*
-rwxr-xr-x 1 root root 1945 2005-05-28 14:29 ip-up.OLD*
-rw------- 1 root root 541 2005-05-28 14:58 options
-rw------- 1 root root 656 2005-05-28 14:56 options.demand
-rw-r--r-- 1 root root 9975 2005-05-28 11:21 options.old
-rw------- 1 root root 216 2005-05-28 14:56 pap-secrets
drwxr-xr-x 2 root root 4096 2003-03-02 22:05 plugins/
-rw-r--r-- 1 root root 104 2003-03-02 22:04 pppoe-server-options
-rw-r--r-- 1 root root 4562 2003-03-02 22:04 pppoe.conf
-rw------- 1 root root 129 2005-05-28 15:12 pppscript
-rw------- 1 root root 8941 2005-05-28 14:56 pppsetup.txt
For the sake of safety do copy your original options file to a file options.old so that you can revert back to your original setup should you have troubles.
See the PPP HOWTO Chapter 10 for more information on PPP support in the Linux kernel.
5. Configuring your Phone
Currently Reliance comes with one of two brands of handsets: LG and Samsung. TATA Indicom also provides two handsets: LG and AXESSTEL.
Plug the cable to the phone and also to the system.
It is important to note that all these phones act as a serial modem so they do not require a driver or anything. After you have connected your phone to the cable, the cable is plugged in either COM1 or COM2 (and not COM3 or COM4, as these are virtual ports).
Remember:
COM1 in LINUX is /dev/ttyS0
COM2 is LINUX is /dev/ttyS1
Your phone modem works on either of the two ports, but I suggest that first try /dev/ttyS1, so as not to disturb other peripherics on your system that are also using a serial port, which would then usually be on /dev/ttyS0.
First check if your COM port is fine using the command
setserial /dev/ttyS1 -a
If it displays something like this:
dev/ttyS1, Line 1, UART: 16550A, Port: 0x02f8, IRQ: 3
Baud_base: 115200, close_delay: 50, divisor: 0
closing_wait: 3000
Flags: spd_normal skip_test
then your COM port is fine. If this does not work, it is possible that PPP support is not configured after all. Return to Section 4 to check. If you are sure that PPP support is configured on your system, maybe the problem is with the COM port. You could try the other port in that case.
Now go to the shell and type
cat /dev/ttyS1
If this prints nothing, your phone is configured. Type CTRL+C to exit.
If your modem is not configured, the cat command would give an error message like this:
cat: /dev/ttyS1: No such device
Alternately, in case you use KDE, start the KPPP program: go to the desktop and press Alt+F2 and type "kppp" in the box which appears. This will start KPPP.
Testing using KPPP:
Click on the Configure button. Go to the Modem tab.There add a new modem on /dev/ttyS1and click OK. Now select the newly created modem and click the EDITbutton. In the new box which appears, select Modemand then click Query modem. If the modem is properly set then you will get the proper status of the modem. It will first say something like "Finding Modem", then some more messages.
Lock file
BE SURE TO UNCHECK THE USE LOCK FILE CHECKBOX in the modem properties, else it may give some random errors.
If all is fine you will be presented with a window with some blank textboxes and you can go ahead.
6. PPP Configuration
Make an easy link to your modem device:
ln -s /dev/ttyS1 /dev/modem
Now change to the /usr/sbin directory and look for ppp files. Look for either a pppsetup or a pppconfig script. You may directly start this script to set up PPP on your system. On my Slackware system I typed pppsetup and started the script. This script asks for various parameters for connecting via the ISP.
It first asks for the phone number to dial -- enter "atdt#777", where 777 is replaced by the number that you need to dial.
It then asks for the modem -- select /dev/ttyS1
Baud Rate -- select "115200"
Callback -- Answer "NO"
Modem INIT String -- "ATZ OK "at+crm=1" OK"
ISP Domain Name -- Leave blank
DNS Server Address -- Enter a valid DNS Server IP, for instance "202.41.97.3" or "202.41.97.132", or leave blank
Authentication -- "PAP"
Username
Password
Refer to Section 3 for Username and Password.
Finally it shows you your configuration.
Some more work needs to be done. We need to edit the options file present in the /etc/ppp folder. We need to check if the following entries are present in the file:
lock
defaultroute
noipdefault
modem
/dev/ttyS1
115200
crtscts
noauth
passive
asyncmap 0
The noauth option
Remember that noauth is by default commented; you need to uncomment it.
You can use egrep -v '#^ *$' /etc/ppp/options to list only the options present in this file so as to quickly judge which ones are missing or incorrect.
7. Let's Get Started
For testing purposes log in as root and open two different shells.
In one shell issue the command
tail -f /var/log/messages
Start the PPP connection in the other shell using the command
ppp-on
In the first shell you will see various messages indicating that the modem is initialized and that the connection is being established. My /var/log/messages looks like this:
May 29 06:14:06 dhiraj pppd[2341]: pppd 2.4.2 started by root, uid 0
May 29 06:14:07 dhiraj chat[2343]: timeout set to 60 seconds
May 29 06:14:07 dhiraj chat[2343]: abort on (ERROR)
May 29 06:14:07 dhiraj chat[2343]: abort on (BUSY)
May 29 06:14:07 dhiraj chat[2343]: abort on (NO CARRIER)
May 29 06:14:07 dhiraj chat[2343]: abort on (NO DIALTONE)
May 29 06:14:07 dhiraj chat[2343]: send (ATZ^M)
May 29 06:14:07 dhiraj chat[2343]: expect (OK)
May 29 06:14:07 dhiraj chat[2343]: ATZ^M^M
May 29 06:14:07 dhiraj chat[2343]: OK
May 29 06:14:07 dhiraj chat[2343]: -- got it
May 29 06:14:07 dhiraj chat[2343]: send (at+crm=1^M)
May 29 06:14:07 dhiraj chat[2343]: expect (OK)
May 29 06:14:07 dhiraj chat[2343]: ^M
May 29 06:14:07 dhiraj chat[2343]: at+crm=1^M^M
May 29 06:14:07 dhiraj chat[2343]: OK
May 29 06:14:07 dhiraj chat[2343]: -- got it
May 29 06:14:07 dhiraj chat[2343]: send (atdt#777^M)
May 29 06:14:07 dhiraj chat[2343]: timeout set to 75 seconds
May 29 06:14:07 dhiraj chat[2343]: expect (CONNECT)
May 29 06:14:07 dhiraj chat[2343]: ^M
May 29 06:14:07 dhiraj chat[2343]: atdt#777^M^M
May 29 06:14:07 dhiraj chat[2343]: CONNECT
May 29 06:14:07 dhiraj chat[2343]: -- got it
May 29 06:14:07 dhiraj pppd[2341]: Serial connection established.
May 29 06:14:07 dhiraj pppd[2341]: Using interface ppp0
May 29 06:14:07 dhiraj pppd[2341]: Connect: ppp0 <--> /dev/ttyS1
May 29 06:14:13 dhiraj pppd[2341]: PAP authentication succeeded
May 29 06:14:13 dhiraj kernel: PPP BSD Compression module registered
May 29 06:14:13 dhiraj kernel: PPP Deflate Compression module registered
May 29 06:14:14 dhiraj pppd[2341]: local IP address 220.224.45.140
May 29 06:14:14 dhiraj pppd[2341]: remote IP address 97.235.2.5
Now open your browser and get started.
In case the browser gives the error that the server name is not being resolved, open the file /etc/resolve.conf and add the entry
namesserver 202.41.97.9
nameserver 202.41.97.132
These are two valid DNS servers of Ernet India Labs, located in New Delhi. Your Internet Service Provider probably provides its own name service, use the IP addresses of the servers they recommend.
When you are finished surfing the net you may stop the connection using
ppp-off
in the second shell. In the other shell window you will get something like this :
May 29 06:16:15 dhiraj pppd[2341]: Terminating on signal 2.
May 29 06:16:15 dhiraj pppd[2341]: Connection terminated.
May 29 06:16:15 dhiraj pppd[2341]: Connect time 2.2 minutes.
May 29 06:16:15 dhiraj pppd[2341]: Sent 3401 bytes, received 1563 bytes.
May 29 06:16:16 dhiraj pppd[2341]: Connect time 2.2 minutes.
May 29 06:16:16 dhiraj pppd[2341]: Sent 3401 bytes, received 1563 bytes.
May 29 06:16:16 dhiraj pppd[2341]: Exit.
Stop the messages output using Ctrl+C.
Knoppix 5.1.1 USB Installation process
Labels: Linux 0 commentsKnoppix 5.1.1 USB Installation process:
Download the Knoppix 5.1.1 ISO and burn it to CD
Insert a 1GB or larger USB flash drive
Restart your Computer and boot from the Knoppix CD
Open up a terminal and type sudo su
Type fdisk -l note which drive is your USB stick (I.E: sda) Throughout this tutorial we use x as our flash drive letter. Replace x with your actual flash drive letter. For example, if your flash drive is sdb, replace x with b.
Type umount /dev/sdx1
Type fdisk /dev/sdx
type p to show the existing partition and d to delete it
type p again to show any remaining partitions (if partitions exist, repeat the previous step)
type n to make a new partition
type p for primary partition
type 1 to make this partition one
hit enter to use the default first cylinder
type +750M to make the partition 750 MB
type a to make this partition active
type 1 to select partition one
type t to change it’s file system
type 6 to select the fat16 file system
type n to make another new partition
type p for primary partition
type 2 to make this the second partition
hit enter to use the default first cylinder
hit enter again to use the default last cylinder
type w to write the new partition table
Type umount /dev/sdx1 to ensure the partition is unmounted
Type mkfs.vfat -F 16 -n usb /dev/sdx1 to format the first partition
Type umount /dev/sdx2 to ensure the partition is unmounted.
Type mkfs.ext2 -b 4096 -L casper-rw /dev/sdx2 to format the second partition
Remove and reinsert your USB flash drive
Type mkdir /tmp/usb
Type mount /dev/sdx1 /tmp/usb
Type cd /cdrom
Type cp -rf KNOPPIX boot/isolinux/* /tmp/usb
Type cd /tmp/usb
Type mv isolinux.cfg syslinux.cfg
Type cd
Type umount /tmp/usb
Type syslinux -sf /dev/sdx1
Reboot your computer and set your system BIOS to boot from USB-HDD. Also set the boot priority to boot the USB device first if this option is available.
You should now be able to boot Knoppix 5.1.1 via your USB stick and use the Knoppix Persistent feature to save your changes back to the സ്ടിച്ക്.
Put your Life On a USB Stick [Linux]
Labels: Linux 0 comments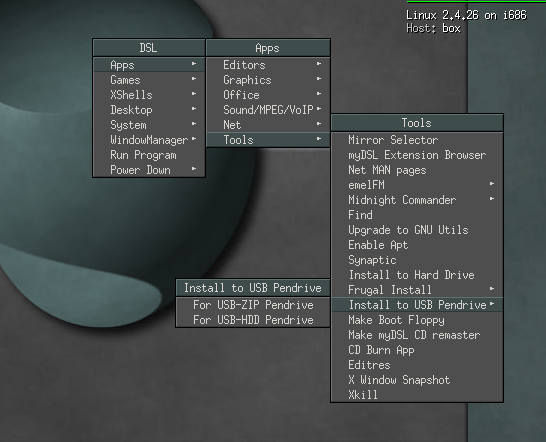

Last time, I wrote about Live CDs and how you can make your own custom one. Live CDs are great, but let’s face it, sometimes even a CD is just too big to carry around. You male geeks probably have no idea what I’m talking about, but the other ladies can testify that the pockets on our clothes are just too small to carry around anything bigger than a small cell phone. CDs also have the magic ability to go from pristine to horribly scratched about 5 minutes before you need them and, since they’re CDs, don’t save changes.
Every bootup is like a clean install. This can be great if you have a tendency to break your configs. It’s actually a great way to poke at your system and break things without any repercussions. However, being able to persist changes could be nice, right? Aibek wrote about a few Windows-based solutions to this last week. Linux users can make a persistent live USB stick to solve these problems.
You have two options when getting or making a persistent USB drive. The first option is to have the operating system installed natively on the drive. This is probably more common. The other way is to have a portable virtual machine on the drive which loads using Qemu. The main advantage of the latter is to avoid having to reboot. The former is the preferred choice when there is a chance that the computer lacks a hard drive or if you need to rescue data from a MacBook Air, since they lack optical drives.
There are a few different ways to get one of these. The easiest is to buy a 4GB Mandriva Flash 2008 or 2GB Damn Small Linux USB Drive. The Damn Small one has both an installed system and a Qemu-based system on it, though these do not, to my knowledge, share files. You do have the option to use whichever is more convenient at the time, though. The alternative is, of course, to make one yourself. I guess the remaining option would involve Tom Sawyer-ing your annoying little brother into doing it.
The main difference in installation methods will be whether or not you need to be running from a Live CD already. On the Ubuntu Wiki, there are directions to install which do not require that you be running from a Live CD, though you do need to have the .iso available. The directions are pretty complicated, but all of the steps are there. A friend of mine, who regularly uses a persistent Ubuntu flash drive to boot up and watch Star Trek during his office hours, recommends following Pendrive Linux’s Ubuntu 7.10 directions if possible. Those directions do require that you be running from a Live CD, but he said they were considerably more straightforward. There’s even a nice little script to automate parts of it, and you don’t have to edit any configuration files like you do with the wiki’s directions. Pendrive Linux has directions for tons of distros, including SuSE, PCLinuxOS, Gentoo, and SLAX. Many of these involve scripts for Windows so you can install to the flash drive from inside Windows without a Live CD. Really guys, if you want an easy install—one that doesn’t even involve figuring out how to burn an ISO with whatever CD burning software you have—this is it.
If your flash drive is really small and you don’t mind booting from a Live CD, Damn Small Linux’s Live CD includes a menu option to install to a flash drive. Damn Small is only 50MB, so even that 3 year old 128MB stick you’ve got in the back of the junk drawer will work. The old Pentium II will also be able to handle it extremely well. This is a great choice for old hardware.
I wish I’d known about these the first time my laptop went out of commission. I carried around an external hard drive in an enclosure for 3 weeks, booting random computers from it, while it was being fixed. In a world where CDs are increasingly seen as annoyingly large, a full 3.5″ hard drive is a crazy thing to carry around.
Linux System Initialization
Labels: Linux 0 commentsLinux System Initialization
By David Bandel on Tue, 1998-12-01 02:00.
SysAdmin
Mr. Bandel takes a look at system initialization for various distributions.
As the title indicates, I will discuss, in one form or another, how Linux system initialization works.
System initialization starts where the kernel bootup ends. Among the topics I intend to explain include
system initialization à la Slackware--a BSD (Berkeley Software Distribution) knock-off--as well as
System V (five) initialization à la Red Hat, Caldera, Debian, et al., and also point out the
differences between them. You'll soon see that the systems are truly more similar than they are different,
despite appearances to the contrary. I will also cover passing switches through LILO to init during the boot
process--this is used mostly for emergencies.
What I will not discuss (for brevity's sake) are the details in some of Red Hat's, Caldera's or other
initialization scripts, specifically configuration information found in the /etc/sysconfig or /etc/modules
directories. For those details, you're on your own. Besides, those details are more subject to change from
one release to the next.
BSD vs. System V
Back in the days when UNIX was young, many universities obtained ``free'' copies of the operating system
(OS) and made improvements and enhancements. One was the University of California at Berkeley. This school
made significant contributions to the OS, which were later adopted by other universities. A parallel
development began in a more commercial environment and eventually evolved into what is now System V. While
these two parallel systems shared a common kernel and heritage, they evolved into competing systems.
Differences can be found in initialization, switches used by a number of common commands (such as ps:
under BSD, ps aux is equivalent to System V's ps -ef), inter-process communications (IPC),
printing and streams. While Linux has adopted System V inits for most distributions, the BSD command syntax
is still predominant. As for IPC, both are available and in general use in Linux distributions. Linux also
uses BSD-style printcaps and lacks support for streams.
Under initialization, the biggest difference between the two (BSD and System V) is in the use of init scripts. System V makes use of run levels and independent stand-alone
initialization scripts. Scripts are run to start and stop daemons depending on the runlevel (also referred to
as the system state), one script per daemon or process subsystem. System V states run from 0 to 6 by default,
each runlevel corresponding to a different mode of operation; often, even these few states are not all used.
BSD has only two modes (equivalent to System V's runlevels), single-user mode (sometimes referred to as
maintenance mode) and multi-user mode. All daemons are started essentially by two (actually more like four to
six ) scripts--a general systems script, either rc.K or rc.M for single- or multi-user mode, respectively, a
local script and a couple of special scripts, rc.inet and rc.inet2. The systems script is usually provided by
the distribution creator; the local script is edited by the system administrator and tailored to that
particular system. The BSD-style scripts are not independent, but are called sequentially. (The BSD
initialization will be most familiar to those coming from the DOS world.) The two main scripts can be
compared to config.sys and autoexec.bat, which, by the way, call one or two other scripts. However, the
likeness ends there. Having only these few scripts to start everything does not allow for the kind of
flexibility System V brings (or so say some). It does, however, make things easier to find. In System V
circles (but only in System V circles), BSD initialization is considered obsolete--but what do they know?
Like a comfortable pair of shoes, it won't be discarded for a very long time, if ever.
Recall that earlier I said Slackware did a BSD knock-off, and yet it still uses the rc.S/rc.M, et al.,
scripts. This is because inittab, (which we'll look at later) uses the same
references to runlevels, and uses those (very much System V) runlevels to decide which scripts to run. In
fact, the same init binary is used by all the distributions I have looked
at, so there is really less difference between Slackware and Red Hat or Debian than appears on the surface,
not at all like older BSD systems that reference only modes ``S'' or ``M''.
init: Where It All Begins
Once the kernel boots, we have a running Linux system. It isn't very usable, since the kernel doesn't
allow direct interactions with ``user space''. So, the system runs one program: init. This program is responsible for everything else and is regarded as the father of
all processes. The kernel then retires to its rightful position as system manager handling ``kernel space''.
First, init reads any parameters passed to it from the command line. This command line was the LILO prompt
you saw before the system began to boot the kernel. If you had more than one kernel to choose from, you chose
it by name and perhaps put some other boot parameters on the line with it. Any parameters the kernel didn't
need, were passed to init. These command-line options override any options contained in init's configuration
file. As a good inspection of what's really going on will tell you, runlevels are just a convenient way to
group together ``process packages'' via software. They hold no special significance to the kernel.
When init starts, it reads its configuration from a file called inittab
which stands for initialization table. Any defaults in inittab are discarded if they've been overridden on
the command line. The inittab file tells init how to set up the system. Sample Slackware, Red Hat and Debian
inittabs are included later in this article.
inittab Specifics
Reading inittab, we'll be skipping any lines that begin with a ``#'', since these are comments and ignored
by init. The rest of the lines can be easily read as many other typical UNIX-like configuration tables, i.e.,
each column is separated by a ``:''
(id:runlevel:action:process) and can
be read as follows:
id: This first column is a unique identifier for the rest of the
line. On newer Linux systems, it may be up to four alphanumeric characters long, but is typically limited to
two. Older systems had a two-character limitation, and most distributions have not changed that custom.
runlevel: The second column indicates what runlevel(s) this row is
valid for. This column may be null or contain any number of valid runlevels.
action: This can be several different things, the most common being
respawn, but can also be any one of the following: once, sysinit, boot,
bootwait, wait, off, ondemand, initdefault, powerwait,
powerfail, powerokwait, ctrlaltdel or kbrequest.
process: This is the specific process or program to be run.
Each row in inittab has a specific, unique identifier. Normally, you will want this to be something easily
associated with the specific action performed. For example, if you want to put a getty on the first serial port, you might use the identifier s1. When I execute
w to see what processes are running, I can more easily identify who is
logged in via the modem on com1 when that user is identified as being on s1.
The runlevels are identified as 0 to 6 and A to C by default. Runlevels 0, 1 and 6 are special and should
not be changed casually. These correspond to system halt, maintenance mode and system reboot, respectively.
Changing runlevel 1, for example, can have far-reaching consequences. Note that to enter maintenance mode
(state 1), you can pass init (via telinit2) the argument 1.
Alternately, you can use S or s for maintenance mode. If you change what transpires for state
1, the same changes will apply when S or s is passed. However, runlevels 2 through 5 can be
customized as desired.
Many systems have the command runlevel (usually found in /sbin).
Executing this command will output the previous runlevel and the present runlevel as follows: N 2. The
N indicates no previous runlevel. If you make a change, say, to state 3 and then reissue the runlevel
command, you'll see 2 3.
Since a good demonstration will illustrate better than just telling you about it, try this on your system.
(Note that I have done this successfully on Debian 1.3 and a few others, such as an older Red Hat [perhaps
3.0], but not many others, so your mileage may vary.) As root (only root can tell init to change states),
issue the init command. You should see a usage message telling you to pass init an argument consisting of a
number from 0 to 6, the letters A to C or S or Q. Lowercase letters are syntactically the same as their
uppercase counterparts. If you pass init anything other than legal values, you should receive this same usage
message. Now pass init the argument 8, as in init 8 (or telinit 8, if you wish). If
nothing appears to happen, don't worry. Now type runlevel again, and you should see 2 8. If you
don't have runlevel on your system, try ps ax | grep init and you may see init [8]. You may or
may not see the runlevel listed in square brackets. Once you have confirmed that you actually did change to
runlevel 8, change back to your previous runlevel. Note that, should your gettys die, they won't respawn at
this runlevel, so you could have a problem logging in again after you log out. If you are unsure what your
default runlevel is, look in inittab near the top for a line where the first column is id and the
third is initdefault. The second column in this line is the default runlevel. An example line looks
like this:
id:3:initdefault
This demonstration was designed to show you that while runlevels 7 to 9 are undocumented, they actually
are available for use should you need them. (I'll explain later why nothing happened when you changed
states). They aren't used only because it's not customary. The customizable states for Linux (2 through 5)
are usually more than sufficient for anyone.
The letters A to C are used when you want to spawn a daemon listed in inittab and have this ``runlevel''
designation on a one-time basis (on demand). Therefore, telling init to change to state C doesn't change the
runlevel, it just performs the action listed on the line where the runlevel is listed as C. Perhaps you want
to put a getty on a port to receive a call, but only after receiving a voice call first (not every time).
Let's further suppose you want to be ready to receive either a data call or a fax call, and when you get the
voice message, you'll know which you want. You can put two lines in inittab, each with its own ID, and each
with a runlevel such as A for data and B for fax. When you know which you need, you simply spawn the
appropriate one from a command line: telinit A or telinit B. The appropriate getty will be put
on the line until the first call is received. Once the caller terminates the connection, the getty will drop,
because by definition, an on-demand process will not respawn.
The other two letters, S and Q, are special. As I noted earlier, S will bring your system to maintenance
mode which is the same as changing state to runlevel 1. The Q is necessary to tell init to reread inittab.
inittab may be changed as often as required, but will be read only under
certain circumstances: one of its processes dies (do we need to respawn another?), on a powerfail signal from
a power daemon (or the command line), or when told to change state by telinit. So the Q argument will tell
init, ``I've changed something, please reread the inittab.''
Before I delve into sections grouped by distribution, I'd like to emphasize that they don't stand alone.
Each of the following sections will complement the others.
Slackware (BSD) inittab
Let's take a look at the sample Slackware inittab in Listing 1.
I've numbered the lines for easy reference. The numbers don't appear in your inittab--your inittab will begin
two spaces to the right of the line numbers. Within the inittab file, lines beginning with a ``#'' sign are
disabled and left as explanatory remarks or examples for possible future use. Be sure to read all the
comments throughout; they were inserted to help you and may give you a hint on how to better customize your
own inittab. Most programs, such as mgetty or efax, that were meant to run from inittab come with examples of how to implement
them.
Since you already know how to read a line (id:runlevel(s):action:process), I'm going to cover only
those few lines of special interest.
As I've already mentioned, Slackware isn't a true BSD system in the old style. Rather than having just a
single-user mode and multi-user mode, it actually uses runlevel 3 as its default runlevel. It runs a system
initialization script first, rc.S. This script is designed to be run only once at bootup. Then it runs rc.M.
It skips the line with rc.K unless a system operator intervenes and deliberately changes to that state. When
changing states between single-user and multi-user modes, the appropriate script is called. (See Listing 1,
lines 15, 18 and 21.)
rc.0 and rc.6 are each files that are also run when the system is brought down. (See Listing 1, lines 27
and 30.)
You will see power management (UPS power management) handled in the script as well as the
ctrl-alt-del key sequence. (See Listing 1, lines 24, 33, 36 and 39.)
Something odd you should notice about this inittab (which was lifted straight from a distribution CD):
while the default init runlevel is 3, if a power daemon signals the system to shut down, then power is
restored, the shutdown is canceled, and the system is brought back up at runlevel 5. However, since runlevels
3 and 5 are essentially identical (they run the same rc scripts), there is no difference in this case.
Now we come to the standard part which all inittabs were specifically designed to handle: initializing and
respawning gettys. When UNIX was young, dumb terminals hung off serial ports. These dumb terminals were
called teletype terminals or simply TTYs. So, the program that sent a login screen to the tty was called
getty for ``get TTY''. Today's getty performs the same basic function,
although the TTY today is not likely to be quite so dumb. Adding and subtracting virtual terminals is as easy
as adding or subtracting lines in the inittab; you can have up to 255.
Next, you'll see a line that allows the X Display Manager (XDM) to be respawned in runlevel 4.
About the only thing I haven't mentioned is that the scripts which do all the work on the Slackware system
are all located in /etc/rc.d. Look them over. Slackware uses a minimal number of scripts to start background
processes. Specifically referenced by inittab are rc.S, rc.K, rc.M, rc.0 and rc.6. Called by scripts (such as
rc.M), but not by init, are rc.inet, rc.inet2, rc.local, rc.serial and others.
Sys V inittab (à la Red Hat)
Take a look at the Red Hat inittab (Listing 2). In this file are
some good explanations of what Red Hat does with runlevels. I won't belabor it further here. Note that the
runlevels chosen for use by Red Hat are just one convention and not indicative of all System V UNIX systems,
not even other Linux System V initializations.
As you can see, Red Hat defaults to runlevel 3, but you can change this to 5 once you have the X server
properly configured. (See Listing 2, lines 18 and 56.) Given the number of graphical tools Red Hat has put
together, you'd think they'd encourage the use of runlevel 5, but using that as the out-of-the-box default
would cause trouble if X was not properly configured first.
Just below the default runlevel, you'll see the system initialization script (Listing 2, line 21). This is
run once when the system boots. Then init jumps down to (in this case) line 13 (Listing 2, line 26). The
lines for 10 through 12 and 14 through 16 are skipped because our default runlevel is 3.
Notice that ud, ca, pf and pr run regardless of the runlevel. When the
runlevel column is null, the process is run in every runlevel.
The getty lines should look familiar to you. Don't be bothered by the fact that Red Hat chose mingetty over getty. They both do the same thing: send a login banner to the tty.
Finally, runlevel 5 spawns XDM (X Display Manager).
Under Red Hat, you'll find all the system initialization scripts in /etc/rc.d. This subdirectory has even
more subdirectories--one for each runlevel: rc0.d to rc6.d and init.d. Within the /etc/rc.d/rc#.d
subdirectories (where the # is replaced by a single digit number) are links to the master scripts stored in
/etc/rc.d/init.d. The scripts in init.d take an argument of start or stop, and occasionally
reload or restart.
The links in the /etc/rc.d/rc#.d directories all begin with either an S or a K for start or
kill respectively, a number which indicates a relative order for the scripts and the script name--commonly
the same name as the master script found in init.d to which it is linked. For example, S20lpd will run the
script lpd in init.d with the argument start which starts up the
line-printer daemon. The scripts can also be called from the command line:
/etc/rc.d/init.d/lpd start
The nice part about System V initialization is that it is easy for root to start, stop, restart or reload
a daemon or process subsystem from the command line simply by calling the appropriate script in init.d with
the argument start, stop, reload or restart.
When not called from a command line with an argument, the rc script
parses the command line. If it is running K20lpd, it runs the lpd init script with a stop argument.
When init has followed the link in inittab to rc.d/rc3.d, it begins by running all scripts that start with a
K in numerical order from lowest to highest, then likewise for the S scripts. This ensures that the correct
daemons are running in each runlevel, and are stopped and started in the correct order. For example, you
can't start sendmail or bind/named (Berkeley DNS or Domain Name Service daemon) before you start networking. The
BSD-style script Slackware uses will start networking early in the rc.M script, but you must always be
cognizant of order whenever you modify Slackware startup scripts. Remember when we changed to runlevel 8
above and nothing happened? Since no subdirectory rc8.d exists and consequently no kill or start scripts, no
scripts were run when we changed states. Had we come from boot directly to runlevel 8, we would have had a
problem. Only the kernel, init and those daemons started via the sysinit,
boot or bootwait commands in the inittab
would have been running. I'll let you look at the scripts in the ../init.d/ directory for yourself, but an
example for those with Slackware systems is shown in Listing 3.
For those who find editing links to add or delete scripts in any particular runlevel a tedious task or who
are just not comfortable doing this, Red Hat distributes a program called tksysv. This program uses a graphical interface (using Tcl/Tk) to read the script names
in /etc/rc.d/init.d and displays them on the far left side of the application box. If you have a system with
init.d in a different location, you can install symbolic links (for each of the rc#.d directories) and it
will function just fine, or hack the script and customize it to your system. The system also reads the links
in each of the rc#.d subdirectories and displays them for each runlevel from left to right with start scripts
above and kill scripts below. (See Figure 1.) You can add, delete and even change the order of execution as
you see fit.
Figure 1. System V Runlevel
Manager
SysV inittab (à la Debian)
Now take a look at the sample Debian inittab. While similar to Red Hat's inittab, it also has some
differences. First, you'll notice that while Red Hat used runlevel 3 for non-graphical mode and runlevel 5
for graphical mode, Debian uses runlevel 2 for both (see Listing 4,
line 5). The difference is in Debian's use of a start/kill script for XDM.
I'd also like to draw your attention to a very special line, line 12. The line begins with ``~~'' (two
tildes). Note that in single-user mode (state 1 or S), sulogin is called.
This prevents someone from just booting the system and becoming root. While it doesn't prevent other tricks
from being used to ``back door'' the system and isn't a substitute for physical security of the system, it
does prevent the casual user from obtaining root access simply by rebooting. The use of the command:
boot from c: only, vice boot a: then c:
combined with password protection of the BIOS setup screens, and a lock on the case to prevent someone
from resetting the BIOS on the motherboard, and finally setting LILO to 0 seconds, the computer is almost 50%
of the way to being secured from unauthorized tampering. (You can get almost another 45% from the system
itself, but note that the last 5% is effectively out of reach.)
Just below the script calls for each runlevel is another line to put a login screen up for root in
runlevel 6. This is only for emergencies, should something go wrong with the kill scripts in runlevel 6 and
the system does not halt properly. It should never run. (See Listing 3, lines 22 to 30).
The Debian inittab also includes some examples to enable gettys on modem and serial lines, should you find
a use for them. The line that invokes mgetty, however, will obviously not work unless you've installed the
mgetty package.
Following the logic through a boot-up, during a normal boot init knows it
will run in state 2. Armed with this information and not overridden during boot-up, init first runs the
/etc/init.d/boot script. Once this script has run, init then executes /etc/init.d/rc with an argument of 2.
init also runs the commands associated with ca, kb, pf, pn
and po. If you read up on powerfail, you'll see that nothing will happen until a change occurs with the power.
Next, we see that init spawns gettys on the virtual terminals. In this case (runlevel 2), it will spawn six
(see Listing 4, lines 50-55). The rest of the lines are commented out, and not used.
Looking at the /etc/init.d/rc script, you can see how it determines what to run to achieve a state change
or to bring the system to the initial state.
Emergencies
Editing inittab or any of the rc scripts requires some degree of caution. Even the best tests cannot
simulate a complete system reboot, and a script may appear to function properly after a system has
initialized but fail during system initialization. The reasons are diverse, but usually involve getting
things out of order.
In Caldera's Network Desktop, which ran on a 1.2.13 kernel and used modules, I had modified a script to
start the kerneld process early in the boot sequence. When I upgraded the
system to Caldera's OpenLinux v1.0 which ran a 2.0.25 kernel, I made the exact same changes to the same
script, tested it and when I was satisfied all was well, I rebooted. Much to my dismay, the boot process
hung, and guess where--yes, loading kerneld. I found that in the newer kernels, kerneld needed to know the
host name of the computer, which was not yet available. Things like this can happen to anyone. Something as
simple as typing the wrong key or forgetting to give the full path name of a file can leave you in the
lurch.
Fortunately, you can pass boot-time parameters to init. When the system boots and you see: LILO:,
you can press the shift key, then the tab key to see the kernel labels available for booting.
You can then add a kernel label and follow it by any required parameters to boot the system. Any parameters
the kernel needs are used and discarded. For example, if you have more than 64MB of RAM, you need to pass
that information to the kernel in the form mem=96MB. If you pass the -b switch, the kernel
won't use it, but will pass it on to init. The same goes for any single-digit number or the letters S or Q in
either upper or lower case.
By passing any of the numbers or letters to init, we are overriding the defaults in inittab, as I stated
earlier. Most of these numbers or letters do exactly what they would do if passed from a command line on a
running system. However, the -b is special: it is the emergency boot parameter. This parameter tells
init to read the inittab, but for some special exceptions not to execute any of the commands, just drop into
maintenance mode. Thus, no rc scripts will be executed. You may mount the system read-write and fix it. One
exception to not executing any inittab commands is the process id ~~ that should have as its process
sulogin. This will give you a prompt for root's password so no unauthorized person can alter system
files such as /etc/passwd or /etc/shadow.
What if you've made a mistake in the inittab file? Can the system be saved? Yes, but I must warn you not
to do this unless absolutely necessary. Coded into the kernel is the instruction to start init once it is
completely loaded and in memory. If the /etc/inittab is corrupted to the point that init can't run, not even
with the -b switch (I've personally never seen this), it is possible to tell the Linux kernel to run a
different program at bootup instead of init. Instead of issuing the -b switch, substitute
init=/bin/sh after the kernel name. This will cause the kernel to run the bash shell, and you will be
logged in as root. Be careful here, as nothing else is running, e.g., system logging or the update daemon.
This is not a normal mode of operation for the system. Fix whatever is necessary and reboot.
Standards
Now that I've explained a significant part of how Linux system initialization works, I'll tell you how
Linux compares to some of the systems I've worked with.
For BSD-style systems, the first time I saw Slackware, I was amazed at its similarity in boot-up to Ultrix
which I was using on some DEC-5000s--it has the same structure with the rc scripts in /etc/rc.d and the same
names. If Slackware used any system as a pattern, Ultrix could have been one of them. I haven't used any
newer BSD-style systems, so I cannot comment further.
For System V, I can compare the various Linux distributions to several others. The one with the most
resemblance seems to be Sun Solaris, which uses the same structure as Debian, but uses runlevel 3 as its
default and implements XDM startup as Debian. Also, runlevel 5 is used for system shutdown, and the rc
scripts are moved to /sbin. HP-UX 10.20 is also similar, but HP puts the init.d, rc.d and other runlevel
directories under /sbin. IBM's AIX uses System V style initialization, but with most of the individual
scripts for subprocesses called directly from its inittab. Finally, SCO OpenServer uses a system similar to
Debian for its boot-time initialization, but does not use symbolic links to init.d. Instead, all start-kill
scripts are located in rc2.d.
The latest Filesystem Hierarchy Standard (FHS) v2.0 for Linux dated 26 October 1997 states either BSD or
System V style initialization is acceptable. It stopped short, however, of outlining exactly where the rc
scripts would go, except to say they would be below /etc, and future revisions to the standard may provide
further guidance. I find that unlikely, since Red Hat and Debian, both very popular distributions, do it a
little differently. I have no particular preference, and in fact my system has symbolic links which make each
look like the other in case an install process makes an invalid assumption about how my systems are
configured. I will tell you that as lazy as I am, less typing to start and stop daemons is more to my liking,
so /etc/init.d/ gets my vote.
Login Files
Labels: Linux 0 comments/etc/passwd File
Purpose
Contains basic user attributes.
Description
The /etc/passwd file contains basic user attributes. This is an ASCII file that contains an entry for each user. Each entry defines the basic attributes applied to a user. When you use the mkuser command to add a user to your system, the command updates the /etc/passwd file.
Note: Certain system-defined group and user names are required for proper installation and update of the system software. Use care before replacing this file to ensure that no system-supplied groups or users are removed.
An entry in the /etc/passwd file has the following form:
Name:Password: UserID:PrincipleGroup:Gecos: HomeDirectory:Shell
Attributes in an entry are separated by a : (colon). For this reason, you should not use a : (colon) in any attribute. The attributes are defined as follows:
Name Specifies the user's login name. The user name must be a unique string of 8 bytes or less. There are a number of restrictions on naming users. See the mkuser command for more information.
Password Contains an * (asterisk) indicating an invalid password or an ! (exclamation point) indicating that the password is in the /etc/security/passwd file. Under normal conditions, the field contains an !. If the field has an * and a password is required for user authentication, the user cannot log in.
UserID Specifies the user's unique numeric ID. This ID is used for discretionary access control. The value is a unique decimal integer.
PrincipleGroup Specifies the user's principal group ID. This must be the numeric ID of a group in the user database or a group defined by a network information service. The value is a unique decimal integer.
Gecos Specifies general information about the user that is not needed by the system, such as an office or phone number. The value is a character string. The Gecos field cannot contain a colon.
HomeDirectory Specifies the full path name of the user's home directory. If the user does not have a defined home directory, the home directory of the guest user is used. The value is a character string.
Shell Specifies the initial program or shell that is executed after a user invokes the login command or su command. If a user does not have a defined shell, /usr/bin/sh, the system shell, is used. The value is a character string that may contain arguments to pass to the initial program.
Users can have additional attributes in other system files. See the "Files" section for additional information.
Changing the User File
You should access the user database files through the system commands and subroutines defined for this purpose. Access through other commands or subroutines may not be supported in future releases. Use the following commands to access user database files:
chfn
chsh
chuser
lsuser
mkuser
rmuser
The mkuser command adds new entries to the /etc/passwd file and fills in the attribute values as defined in the /usr/lib/security/mkuser.default file.
The Password attribute is always initialized to an * (asterisk), an invalid password. You can set the password with the passwd or pwdadm command. When the password is changed, an ! (exclamation point) is added to the /etc/passwd file, indicating that the encrypted password is in the /etc/security/passwd file.
Use the chuser command to change all user attributes except Password. The chfn command and the chsh command change the Gecos attribute and Shell attribute, respectively. To display all the attributes in this file, use the lsuser command. To remove a user and all the user's attributes, use the rmuser command.
To write programs that affect attributes in the /etc/passwd file, use the subroutines listed in Related Information .
Security
Access Control: This file should grant read (r) access to all users and write (w) access only to the root user and members of the security group.
Examples
Typical records that show an invalid password for smith and guest follow:
smith:*:100:100:8A-74(office):/home/smith:/usr/bin/shguest:*:200:0::/home/guest:/usr/bin/sh
The fields are in the following order: user name, password, user ID, primary group, general (gecos) information, home directory, and initial program (login shell). The * (asterisk) in the password field indicates that the password is invalid. Each attribute is separated by a : (colon).
If the password for smith in the previous example is changed to a valid password, the record will change to the following:
smith:!:100:100:8A-74(office):/home/smith:/usr/bin/sh
The ! (exclamation point) indicates that an encrypted password is stored in the /etc/security/passwd file.
Implementation Specifics
This file is part of Base Operating System (BOS) Runtime.
/etc/group File
Purpose
Contains basic group attributes.
Description
The /etc/group file contains basic group attributes. This is an ASCII file that contains records for system groups. Each record appears on a single line and is the following format:
Name:Password:ID:User1,User2,...,Usern
You must separate each attribute with a colon. Records are separated by new-line characters. The attributes in a record have the following values:
Name Specifies a group name that is unique on the system. The name is a string of 8 bytes or less. See the mkgroup command for information on the restrictions for naming groups.
Password Not used. Group administrators are provided instead of group passwords. See the /etc/security/group file for more information.
ID Specifies the group ID. The value is a unique decimal integer string.
User1,User2,...,Usern
Identifies a list of one or more users. Separate group member names with commas. Each user must already be defined in the local database configuration files.
Do not use a : (colon) in any of the attribute fields. For an example of a record, see the "Examples " section . Additional attributes are defined in the /etc/security/group file.
Note: Certain system-defined group and user names are required for proper installation and update of the system software. Exercise care before replacing the /etc/group file to ensure that no system-supplied groups or users are removed.
You should access the /etc/group file through the system commands and subroutines defined for this purpose. You can use the following commands to manage groups:
chgroup
chgrpmem
chuser
lsgroup
mkgroup
mkuser
rmgroup
To change the Name parameter, you first use the mkgroup command to add a new entry. Then, you use the rmgroup command to remove the old group. To display all the attributes in the file, use the lsgroup command.
You can use the chgroup, chgrpmem, or chuser command to change all user and group attributes. The mkuser command adds a user whose primary group is defined in the /usr/lib/security/mkuser.default file and the rmuser command removes a user. Although you can change the group ID with the chgroup command, this is not recommended.
Security
Access Control: This file should grant read (r) access to all users and grant write (w) access only to the root user and members of the security group.
Examples
A typical record looks like the following example for the staff group:
staff:!:1:shadow,cjf
In this example, the GroupID parameter is 1 and the users are defined to be shadow and cjf.
Implementation Specifics
This file is part of Base Operating System (BOS) Runtime.
6.6. Linux Password & Shadow File Formats
Traditional Unix systems keep user account information, including one-way encrypted passwords, in a text file called ``/etc/passwd''. As this file is used by many tools (such as ``ls'') to display file ownerships, etc. by matching user id #'s with the user's names, the file needs to be world-readable. Consequentally, this can be somewhat of a security risk.
Another method of storing account information, one that I always use, is with the shadow password format. As with the traditional method, this method stores account information in the /etc/passwd file in a compatible format. However, the password is stored as a single "x" character (ie. not actually stored in this file). A second file, called ``/etc/shadow'', contains encrypted password as well as other information such as account or password expiration values, etc. The /etc/shadow file is readable only by the root account and is therefore less of a security risk.
While some other Linux distributions forces you to install the Shadow Password Suite in order to use the shadow format, Red Hat makes it simple. To switch between the two formats, type (as root):
/usr/sbin/pwconv To convert to the shadow format /usr/sbin/pwunconv To convert back to the traditional format
With shadow passwords, the ``/etc/passwd'' file contains account information, and looks like this:
smithj:x:561:561:Joe Smith:/home/smithj:/bin/bash
Each field in a passwd entry is separated with ":" colon characters, and are as follows:
Username, up to 8 characters. Case-sensitive, usually all lowercase
An "x" in the password field. Passwords are stored in the ``/etc/shadow'' file.
Numeric user id. This is assigned by the ``adduser'' script. Unix uses this field, plus the following group field, to identify which files belong to the user.
Numeric group id. Red Hat uses group id's in a fairly unique manner for enhanced file security. Usually the group id will match the user id.
Full name of user. I'm not sure what the maximum length for this field is, but try to keep it reasonable (under 30 characters).
User's home directory. Usually /home/username (eg. /home/smithj). All user's personal files, web pages, mail forwarding, etc. will be stored here.
User's "shell account". Often set to ``/bin/bash'' to provide access to the bash shell (my personal favorite shell).
Perhaps you do not wish to provide shell accounts for your users. You could create a script file called ``/bin/sorrysh'', for example, that would display some kind of error message and log the user off, and then set this script as their default shell.
Note: Note: If the account needs to provide "FTP" transfers to update web pages, etc. then the shell account will need to be set to ``/bin/bash'' -- and then special permissions will need to be set up in the user's home directory to prevent shell logins. See Section 7.1 for details on this.
The ``/etc/shadow'' file contains password and account expiration information for users, and looks like this:
smithj:Ep6mckrOLChF.:10063:0:99999:7:::
As with the passwd file, each field in the shadow file is also separated with ":" colon characters, and are as follows:
Username, up to 8 characters. Case-sensitive, usually all lowercase. A direct match to the username in the /etc/passwd file.
Password, 13 character encrypted. A blank entry (eg. ::) indicates a password is not required to log in (usually a bad idea), and a ``*'' entry (eg. :*:) indicates the account has been disabled.
The number of days (since January 1, 1970) since the password was last changed.
The number of days before password may be changed (0 indicates it may be changed at any time)
The number of days after which password must be changed (99999 indicates user can keep his or her password unchanged for many, many years)
The number of days to warn user of an expiring password (7 for a full week)
The number of days after password expires that account is disabled
The number of days since January 1, 1970 that an account has been disabled
A reserved field for possible future use
Files
/etc/group Contains basic group attributes.
/etc/security/group Contains the extended attributes of groups.
/etc/passwd Contains the basic attributes of users.
/etc/security/passwd Contains password information.
/etc/security/user Contains the extended attributes of users.
/etc/security/environ Contains the environment attributes of users.
/etc/security/limits Contains the process resource limits of users.
/etc/security/audit/config Contains audit system configuration information.
UserManagement
Labels: Linux 0 commentsuseradd
Create new user accounts or update default account information.
Unless invoked with the -D option, user must be given. useradd will create new entries in system files. Home directories and initial files may also be created as needed.
SYNTAX useradd [options] [user]OPTIONS -c comment Comment field. -d dir Home directory. The default is to use user as the directory name
under the home directory specified with the -D option. -e date Account expiration date. date is in the format MM/DD/YYYY. Two-digit year fields are also accepted.
The value is stored as the number of days since January 1, 1970. This option requires the use of shadow passwords. -f days Permanently disable account this many days after the
password has expired. A value of -1 disables this feature. This option requires the use of shadow passwords. -g group Initial group name or ID number. If a different default group has not been specified using the -D option,
the default group is 1. -G groups Supplementary groups given by name or number in a comma-separated list with no whitespace. -k [dir] Copy default files to user's home directory.
Meaningful only when used with the -m option. Default files are copied from /etc/skel/ unless an alternate dir is specified. -m Make user's home directory if it does not exist.
The default is not to make the home directory. -o Override. Accept a nonunique uid with the -u option. (Probably a bad idea.) -s shell Login shell. -u
uid Numerical user ID. The value must be unique unless the -o option is used. The default value is the smallest ID value greater than 99 and greater than every other uid.
-D [options] Set or display defaults. If options are specified, set them. If no options are specified, display current defaults. The options are: -b
dir Home directory prefix to be used in creating home directories. If the -d option is not used when creating an account, the user name will be appended to dir.
-e date Expire date. Requires the use of shadow passwords. -f days Number of days after a password expires to disable an account. Requires the use of shadow passwords.
-g group Initial group name or ID number. -s shell Default login shell.
SYNTAX
useradd [-c comment] [-d home_dir] [-e expire_date] [-f inactive_time] [-g initial_group] [-G group[,...]] [-m [-k skeleton_dir]] [-p passwd] [-s shell] [-u uid [ -o]] login
useradd -D [-g default_group] [-b default_home] [-f default_inactive] [-e default_expire_date] [-s default_shell]
-c comment The new user's password file comment field.
-d home_dir The new user will be created using home_dir as the value for the user's login directory. The default is to append the login name to default_home and use that as the login directory name.
-e expire_date The date on which the user account will be disabled. The date is specified in the format YYYY-MM-DD.
-f inactive_time The number of days after a password expires until the account is permanently disabled. A value of 0 disables the account as soon as the password has expired, and a value of -1 disables the feature. The default value is -1.
-g initial_group The group name or number of the user's initial login group. The group name must exist. A group number must refer to an already existing group. The default group number is 1.
-G group,[,...] A list of supplementary groups which the user is also a member of. Each group is separated from the next by a comma, with no intervening whitespace. The groups are subject to the same restrictions as the group given with the -g option. The default is for the user to belong only to the initial group.
-m The user's home directory will be created if it does not exist. The files contained in skeleton_dir will be copied to the home directory if the -k option is used, otherwise the files contained in /etc/skel will be used instead. Any directories contained in skeleton_dir or /etc/skel will be created in the user's home directory as well. The -k option is only valid in conjunction with the -m option. The default is to not create the directory and to not copy any files.
-p passwd The encrypted password, as returned by crypt. The default is to disable the account.
-s shell The name of the user's login shell. The default is to leave this field blank, which causes the system to select the default login shell.
-u uid The numerical value of the user's ID. This value must be unique, unless the -o option is used. The value must be non-negative. The default is to use the smallest ID value greater than 99 and greater than every other user. Values between 0 and 99 are typically reserved for system accounts.
-b default_home The initial path prefix for a new user's home directory. The user's name will be affixed to the end of default_home to create the new directory name if the -d option is not used when creating a new account.
-e default_expire_date The date on which the user account is disabled.
-f default_inactive The number of days after a password has expired before the account will be disabled.
-g default_group The group name or ID for a new user's initial group. The named group must exist, and a numerical group ID must have an existing entry.
-s default_shell The name of the new user's login shell. The named program will be used for all future new user accounts.
If no options are specified, useradd displays the current default values.
EXAMPLES
Note: For these commands to work you must have super user rights or be logged in as root.
useradd -D
In the above example the useradd command would display the defaults. Below is an example of what could be displayed.
GROUP=100
HOME=/home
INACTIVE=1
EXPIRE=
SHELL=/bin/bash
SKEL=/etc/skel
useradd newperson
In the above example the useradd command would add "newperson" as a new user to the system. Once the new user has been added to the computer you would need to use the passwd command.
Note: Once a user has been created if you wish to modify any of the user settings such as the home directory setting use the usermod command.